It was some 3-4 weeks ago (at a minimum) that I was told we (Tish and I) would be attending a fabric dying class. Each week I would ask "what's coming up this weekend", knowing that the dreaded day of dyeing was approaching. I knew this would be a waste of my time as it did not sound fun in the least. I also knew that I had other projects to work on including a second QAL.

So, Friday night I worked diligently to finish my top for the Snowflake Shimmer QAL ....to late for the link-up...but hey life happens and work does too.

Still not looking forward to Saturday, I went to bed and figured, I'll just deal with it when it gets here.
Saturday came, and we were late getting moving, almost late for the class....well at worst..."fashionably" late. Always make sure you are properly fueled up (Tudor's Biscuit World) before undertaking any stressful process/project.
So, we rolled in to the local art store called Artistry on Main and met Suzan Morgan (suzanmorgan@suddenlink.com). Also there was a local lady from the quilt guild...and so began a very private half day of instruction.
We received a brief introduction into what our process, Low Water Immersion, and how it relates to the both the type of dye and the type of fabric we were using. I won't go into deep detail...1) because I am sure if you google it, you can find more than you need to know...and (2) It would not be fair if it were possible for our (soon we would find out ...WONDERFUL) instructor to make money from teaching. Needless to say, we jumped right in by first selecting our two choices of colorways. I didn't know exactly what to expect so, I was neither surprised nor disappointed by any part of the day. So we started looking at the book. They had a wonderful blue on the table, so I knew that was where I wanted to be a deep Navy/Ocean Blue. But a pleasant surprise befell us. We were allowed to have one that goes from basic to basic line (6 total colors) and one that dealt with brightness of a single color (6 total values). I knew the Values would be the Blue and the Base color I would Start with would go Yellow to Red. I knew it...no hesitation. I love yellow because it is a warm and fun....VIBRANT color. But, if I was to pick a favorite color....it would be a Navy Blue....and our Value colors were in an Earth tone....ALL THE BETTER!!!!!

Needless to say, she wanted to know who wanted to go first...being in Special Operations I knew initiative based tactics are a necessity so I jumped in and said me...So we mixed "Soda Ash" with a gallon of water....mixed a small amount then added the additional needed water. Little did I know this is what makes the color stick to the fabric. And it takes special untreated natural fabric to do this process...just any old fabric won't do....and OF COURSE, me being the need to know it all resident expert (jack of all trades and master of none) I immediately began asking question.....1) Rit Dye?....don't go there, don't even do it....the main thing she said...it will never stop bleeding color....so NO...JUST DON'T DO IT....not her words......mine.
We divided the gallon water up evenly and then got our base colors....mine being Yellow and Red....well Tish and I talked it out and it really is Magenta....I will let Tish explain that though. we then began our mixing process adding the dye to the water...this was our first incident....I dropped magenta dye from to high and it splashed on to her pre-made fabric samples. Tiny spots but I felt bad none the less. Everyone took their turn in mixing ash then colors. We got to our pans and mixed exacting amounts of color and cross mixing each.
Then we "scrunched" our fabric up and placed it in the dye Temps have to be no cooler than 70 for the dye to work correctly so once the dye was scrunched in the bag (scrunching gives the pattern) we set the bags in the dish pans out in the sun.....Special Mental Note...though some recommend 3-4 hr soak...1 hr at correct temperature is all that is needed.
Suzan asked if we wanted to break for lunch....Not this guy I had been asking dozens of questions by this time and was becoming quite engrossed in the process. Suzan brought books that I looked at during short periods she was helping Tish and the other participant. During her initial help with Tish she actually spilled the Magenta/Red on those pretty blue fabrics that were above.. I was shocked and she handled it like a pro...she said she was pretty sure that all that would come out...I wasn't convinced. She said because of the reacting "ash" was not in the fabric it should easily wash out and there should be no evidence....again...NOT CONVICNED!!!!
Now that we made it to everyone being done with the "hue" process, we opted to skip lunch and jump straight into the value...This was what I was excited for....that DEEP blue!!!! So we did the same process as before, only this time there was no two parts to mix....when it came to scrunching...I did mine on diagonals and Tish did hers' on horizontal but a straight line. I wanted a different look so again working outside the box, I threw caution to the wind and went all out with a different process of scrunching.
We placed the this set outside also in the wonderful sunlight. We had major discussion and first and foremost of my questions is...when can we do and advance class with stenciling and advanced dyeing techniques...She said she could do it, but only two at a time and in her home because she has special platform/boards she uses. I told her...well let's get it schedule. I scoured the books for tidbits and asked questions as they came to mind....I can really see me getting behind this process. I even used my GoodReads app to scan some books to look at buying.
So now it is rinse time.


The process of rinse happened for hues and values two separate bags but hey you need space when you are getting 3 yards hue and 3 yards value of fabric...that is right I got hand dyed fabric...dyed by DavetheQuiltEngineer and it was less than $10 a yard....what a deal.
We got some wash instructions and were sent on our way.
Next stop...Walmart to buy a kettle to boil the fabric in...a $60 22 qt boiling kettle...for you guessed it...FABRIC....what the hell has happened to me????
We get home to do 2 washes on hot in the washing machine, then boil till virtually no color bleed off....
I should have taken a picture...my yellow...was orange...as orange as the "B" symbol for Blogger...I was scared. Suzan assured us not to worry..with the Ash neutralized, there would be no bleed across.
I WASN'T CONVINCED!!!!!
So wash and boil...and boil and boil and boil.. I boiled, each time adding a very light detergent provided by Suzan and then adding the fabric...


This morning I did 2 more boils and we called it good....Now to take the finished product out to get pictures.


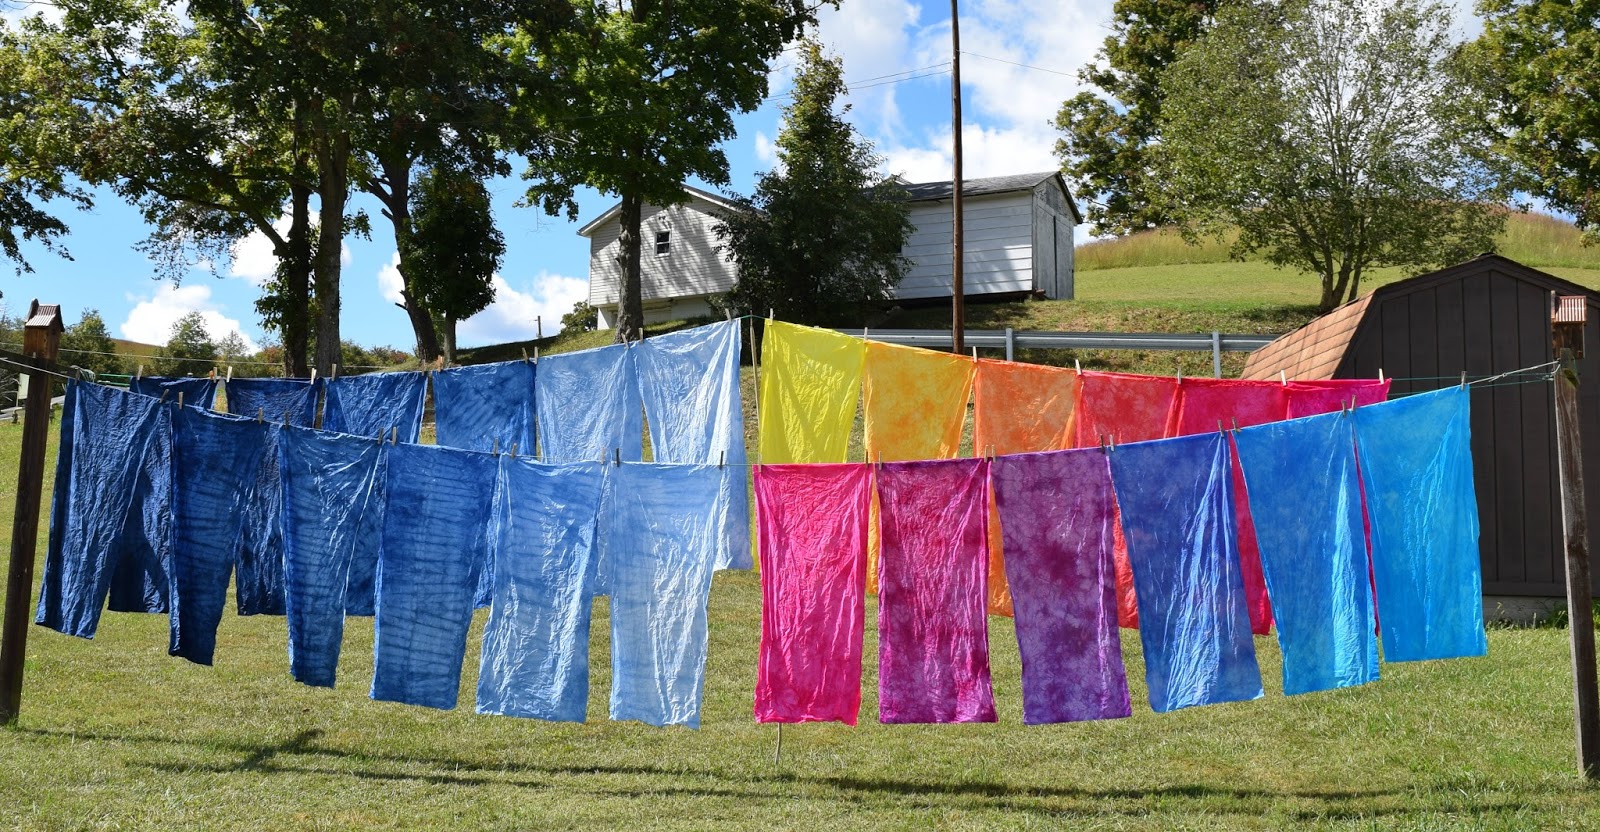

And the bugs LOVE yellow...see the middle picture.
Suzan, even though she was excellent in instruction and guaranteed us that we would not have bleed through called today to check on the status of my yellow. We told her we would be stopping at walmart and the heat in the car was a concern about ruing the yellow into orange. Tish and I both wished we would have taken a picture of the yellow pre-wash...it was ORANGE!!!!! And Suzan, not having left fresh dyed fabric in a car in heat called just to verify she was right on the cross-bleeding of orange....and SHE WAS RIGHT...the pictures prove it!!!

Shew...long post. Needless to say I ABSOLUTELY LOVED this process but was not looking forward to it initially....I am so ready for the advance course and you can BET YOUR SWEET FANNY that I will be doing this again.
Not only am I quilter but may soon be a fabric designer/engineer...LOL.
What a wonderful way to spend a weekend...well except for being steamed do death every 20 minutes while completing the final/boiling process for fabric dying....Now I know how crabs and lobster feel!!!
17 years after marrying her...who woulda thunk it....Quilting and Fabric dyeing....
Initiative Based Tactics....Any Where, Any Time.
Tonight I am linking up with Mollie Sparkles Sunday Stash
You're welcome :P
ReplyDeleteYeah yeah yeah!
ReplyDeleteWell, they look " Absolutely Fabulous">>>>>>> ( didn't add the other word from the TV program) and I think you are tops at this, I can see some more dying days coming soon. Phew, a good time to do it before the really cold, and after the heat of summer. Will you do a swap, or share? Waiting to see a new quilt design with those wonderful colours.
ReplyDeleteGlad it was worth it! The fabric turned out great and it is really fascinating that the bugs were so attracted to the brilliant yellow. :)
ReplyDeleteYou cracked me up with your statement - 'what the hell has happened to me'. LOL You are officially a quilter now, one who will go anywhere, do anything, and most importantly BUY anything needed ($60 pot) for his craft. Welcome to our world!! :)
ReplyDeleteLol! It looks like you've been bitten by the fabric dyeing bug. Your fabric looks amazing.
ReplyDeleteIt all seems terribly labour intensive but the end results are impressive . A lot there as well about tone and value of colours which can be hard (for me anyhow) to comprehend .
ReplyDeleteI missed Yvonne's link up too . Yiur and tish quilts both look brilliant and are such a contrast
Awesome project, Dave! I'm glad I'm not the only one head over heels for dyeing her own fabrics. Your saturation was gorgeous, and I'm popping over to see what Tish had to say about it, too. Can't wait to see what you decide to do with it all.
ReplyDeleteIf I ever have the opportunity, I will now take advantage. Excellent post. Your fabrics are gorgeous!
ReplyDeleteIt sounds like you had an awesome time. Remember....she's always right! I love how your colours turned out. Look forward to seeing more from your dyeing escapades.
ReplyDeleteThey look wonderful, that yellow is to dye for for... You are hooked there is no doubt about welcome to our world.
ReplyDelete